Import a repo
This page covers connecting a GitHub repository to a project so the app can deploy it.
Prerequisite: signed in.
Install the GitHub App
The app uses a GitHub App (named stasho-deploy on GitHub) to access your repositories. The first time you connect a repo, the New Project wizard prompts you to install it.
One install per wallet: connecting a second account or organization replaces the first. If you need repos from multiple orgs, this is an alpha limitation — see Alpha status & limits.
- Click New project in the dashboard
- The wizard opens; if you haven't connected GitHub yet, click Install GitHub App
- GitHub asks which account or organization should host the install — pick the one that owns the repo you want to deploy
- GitHub asks which repositories the App can access — pick Only select repositories and choose specific repos, or All repositories to give it access to everything (you can change this later)
- Click Install
GitHub redirects you back to the wizard. You should now see the Select Repo step with a list of repositories.
What the App can do
GitHub asks you to grant five permissions during the install. Each one is used; none is spare. You don't have to take that on our word: GitHub shows you the list on the install screen before you accept it, and you can re-read exactly what you granted at any time from your installations page.
| Permission | What we do with it |
|---|---|
| Metadata (read) | List the repositories you granted, and read their default branch. GitHub requires this of every App. |
| Contents (write) | Commit the deploy workflow file to a branch, and read your package.json and lockfile to detect the framework. |
| Workflows (write) | GitHub requires this specifically to write files under .github/workflows/, which is where the deploy workflow lives. |
| Pull requests (write) | Open the setup pull request that adds the workflow, and merge it when you confirm in the wizard. |
| Actions (write) | Start a build when you click Redeploy, and cancel a running one when you click Abandon. |
The App also receives two events: workflow_run, so a failed build shows up as a failed deployment, and installation, so uninstalling on GitHub clears the connection on our side.
What that lets us reach
Two of these are broader than what we use them for, because GitHub has no narrower setting:
- Contents (write) covers the whole repository, not just the workflow file. There is no per-file or per-branch permission in GitHub's model. We write one file, on its own branch, via a pull request.
- Actions (write) covers every workflow in the repository, not only ours. We start and cancel our own deploy runs.
Three things bound this in practice:
- Grant only the repos you want. At install time, choose Only select repositories. You can change the selection later from your GitHub settings without disconnecting.
- Every write is attributed and reviewable. Commits the App makes are authored by
stasho-deploy[bot], not by you, and the initial setup arrives as a pull request you read before merging. Nothing lands in your default branch without passing through a diff you can see. - You can revoke at any time, from github.com/settings/installations or from Settings → Integrations in the app. See Keys & authorizations for the wallet-side equivalent.
What the App has no access to: your other repositories, your organization's members or settings, repository secrets, and your GitHub email or profile. It requests no account-level or organization-level permissions at all.
Pick a repository
The Select Repo step shows your accessible repositories with a status column:
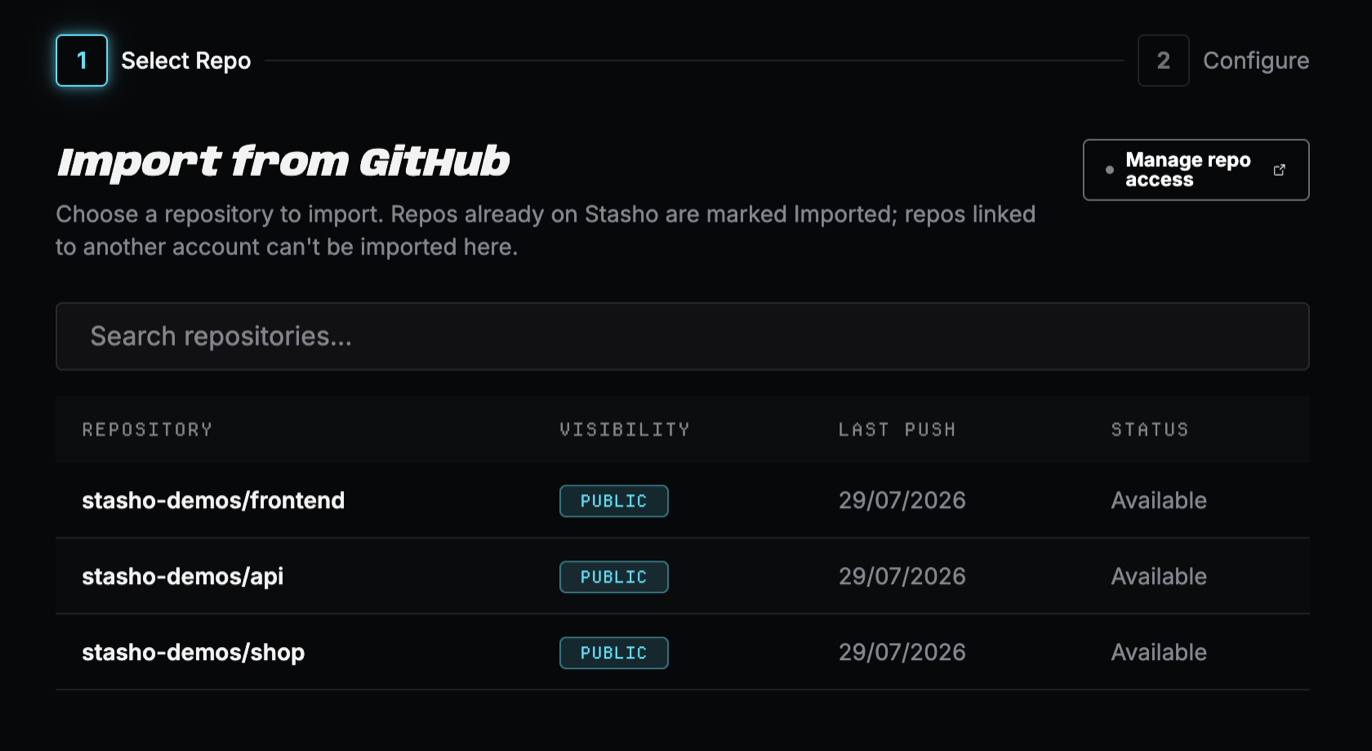
| Status | Meaning |
|---|---|
| Available | Not yet imported into the app — pick this to create a new project |
| Imported | Already imported as a different project — selecting it shows a notice with a link to that project and then continues to workspace detection, so a monorepo whose other workspaces aren't imported yet can still be picked up here |
| Linked to another account | First imported from a different wallet. A repo can only be deployed from the account that imported it, so clicking shows that reason instead of continuing |
If your repository list is empty:
- The App is installed but you didn't grant access to any repositories. Click Manage repo access at the top of the step (links to your GitHub install settings) and grant access to the repos you want.
- Refresh the wizard. The list should populate.
Manage access later
Repository access is managed on github.com, not in the app. Two paths to change it:
- From the wizard — click Manage repo access to open your install settings on GitHub
- From the app — go to Settings → Integrations. The current GitHub install is shown with two actions:
- Manage on GitHub — opens your install settings (same as above)
- Disconnect — removes the install from the app's records, then opens GitHub for you to complete the uninstall
Disconnect
If you uninstall the App on GitHub directly (without using the in-app Disconnect), the app receives a webhook from GitHub and cleans up its internal records automatically. You don't need to do anything in the app.
After disconnect, your existing projects' deployments are unaffected (they're already pinned on IPFS). The app just can't trigger new deployments until you reconnect.
Verification
You should now see:
- A repository selected in the wizard
- The wizard advances to the framework-detection step (covered in Your first deployment)
See it in the demo
The live demo's shop repo group shows what a monorepo import looks like once it's live: two workspace members from the same repository, grouped as siblings with their own build config and deploy history.